How to send Direct Messages with SMS Client Reminders

With SMS Client Reminders you can now send immediate or pre-scheduled Direct Messages directly from your account. You can use this easy-to-use service to quickly send text messages to your clients and prospects whenever required, by following this simple tutorial.
Creating Direct Messages
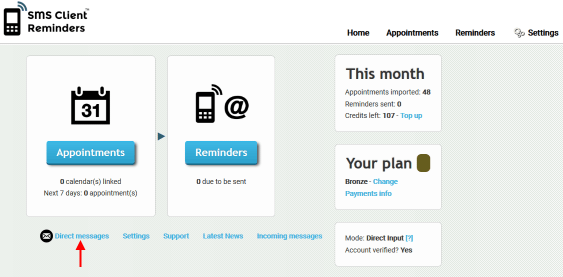
From your account home page, click on the Direct Messages link on the bottom toolbar to access the service. If you are using the free trial service or a new subscriber and have not yet had your account verified to use the Direct Messages service, then please contact us via the Support page to activate this service.
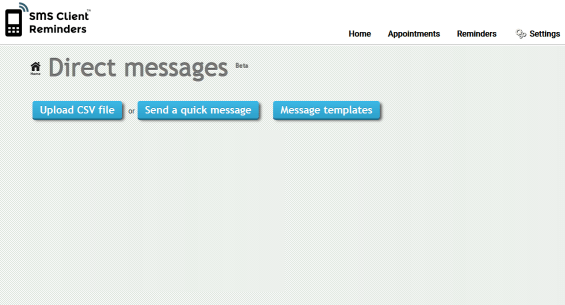
When you first use Direct Messages, you have three options presented on the screen:
- Upload CSV file - this allows you to import your own spreadsheet of contact numbers and any information which you may want to include in the message template such as Name, Location, etc.
- Send a quick message - this is to quickly send one-off messages to existing contacts already stored in the system
- Message templates - this allows you to create, save and edit your message templates which you can use with your uploaded CSV files
Upload a CSV file
Step 1 - If you have your contact phone numbers stored in a spreadsheet or database then you will need to export these and save as a .csv file and save to your computer. You can use Browse button to select the CSV file to upload from your computer, then click Next to import the file. If you find that your contacts are not uploading then check the file is saved in the correct .csv format.
Step 2 - If you have already created a message template you can select the one you want to use for this message. If not you can click Add new template and create one to use (see Message Template guidelines below). Make sure that you Save your new template before returning to this screen and selecting the required template. You can then choose from the dropdown list the column in your CSV file that contains the mobile phone number to be used for each contact. Next you select the time and date that you want to send the message and if you’re in a country that allows Sender ID’s you can choose your preferred ID to replace the sending phone number. Then click Next to preview the messages before sending.
Please note that Sender ID should only be used if you do not want to receive any replies by text as it is a one-way messaging service only. Sender ID is not available in certain countries due to national telecom regulations, in which case the option will not be displayed. If your account is already set-up to use Sender ID for your reminders then the system will automatically use the same Sender ID for Direct Messages.
Step 3 - All the messages will be displayed on screen as they will appear when sent. If you’re happy with them all then click Confirm to send the messages at the scheduled time. If you need to make changes then click Cancel and make the required changes to your template or CSV file as required, then start the process again.
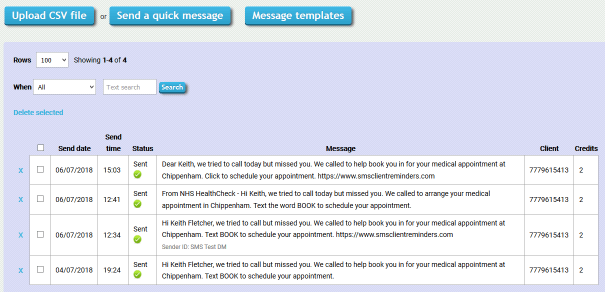
After you have sent your first Direct Messages, you can then use the log file report on the Direct Messages homepage to search for all messages sent over a specific period or to a particular number.
Message templates
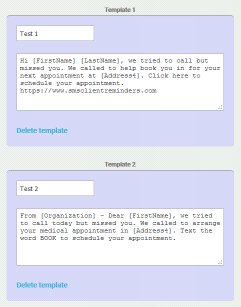
You can create as many templates as you need for different mailing campaigns. Give each template a name so that you will recognize it when selecting them from the list when creating your campaign.
If required, you can include commands in the template to draw in data from your spreadsheet by using the relevant column headings within brackets, for example [FirstName] [LastName].
We recommend that you check the length of your message before sending as each text will deduct credits from your account in the same way as your reminders do, i.e. any messages over 153 characters will use more than one credit. Remember that any data you include from your spreadsheet will also add to the character count of your messages.
Once you are happy with your template(s) make sure you click the Save button at the bottom of the page. You can edit your templates whenever required and any templates that you no longer require can be deleted.
Send quick message
You can use Send quick message to easily communicate a text message with one or more of your existing contacts which are already in the system. So for example, if you need to arrange a meeting with some colleagues and want to send a text to let them know and get them to confirm, then this type of SMS can be sent quickly and simply using this tool.
Just create your message wording, choose when you want to send it and select the contacts you want to send it to, then click Send. That’s it, just takes a few seconds to process and the text will be sent to everyone you selected!
Client Name mode
Please note, if you are using Client Name mode and have your client contact details stored in the system, the Direct Messages tool can only be used to select individual contacts from your Client List if you have less than 100 client contacts in total. If your account has more than 100 contacts, you can export your contacts into a CSV file directly from the Client List and save it to your computer, then use the Upload CSV option in the Direct Message tool to import your client mobile phone numbers and create/select the message template you want to send.